How to build your own three-letter agency with InsightFace and Atlas Local vector search
DISCLAIMER: I am a Senior Software Engineer at MongoDB and worked on MongoDB Atlas Local. All opinions and views expressed in this post are my own.
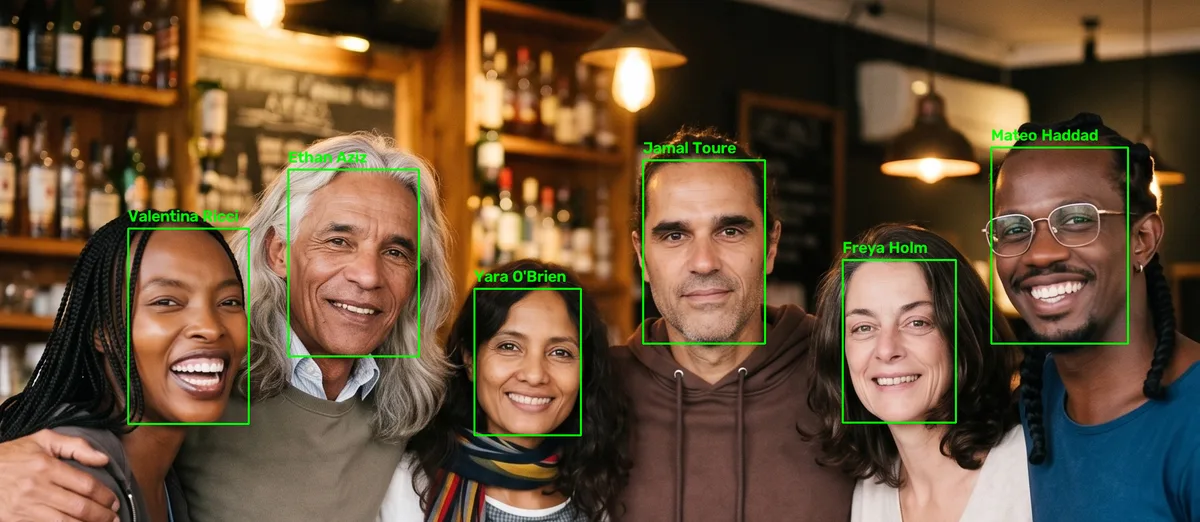
Each of those green boxes is a MongoDB query result.
The database has never seen a pixel. It holds 100 documents, each one a first name, a last name and 512 floating-point numbers, and those 512 numbers are enough to identify every single face in this picture.
Most people, me included, meet Atlas Vector Search through RAG: take some text, embed it, and let LangChain find it again. That is very cool, and it made me wonder: what else can be turned into vectors and searched the same way? Faces, for one. I have wanted my own face database since the first time I saw one on television, so this is me building my own three-letter agency, on a laptop, in a marimo notebook.
(Everything below is for learning. Do not go out and violate people's privacy with it. And if you are an actual three-letter agency, please create the cluster in the cloud.)
What is a face to a database?
=
=
=
InsightFace does the seeing, in
two steps. buffalo_l is its default model pack: a detector (SCRFD-10GF) that
finds every face in the photo and five landmarks on each (eyes, nose, mouth
corners), and a recogniser (a ResNet50 trained on WebFace600K) that takes the
face, rotated and cropped so the landmarks sit where the network expects them,
and turns it into 512 floats. The detector exists because the recogniser was
trained on faces at a known position, not on bars with people in them. The
pack is 326 MB and downloads itself into ~/.insightface/models the first
time the line above runs, so the first run is slower than every run after it.
(ctx_id=0 means "do not force the CPU". InsightFace takes CUDA or CoreML if
onnxruntime has them and otherwise the CPU, silently. My XPS 13 has no
graphics card, so it's using the CPU, and a portrait takes it about 1.6
seconds. On a machine with a graphics card this should run way faster.)
1 face found
embedding:        (512,) numbers, length 20.1
normed_embedding: (512,) numbers, length 1.0
first six:        [-0.0138 -0.0106  0.016  -0.0011  0.0047 -0.0483]
This gives us an embedding for the face. But be careful: don't use
embedding as it comes out. It has to be normalised before it can be compared
with another one, and that is what normed_embedding is: the same 512
numbers,
scaled to length 1.
That is the version we store. (app.get also gives each face its bounding box,
for the green box later.)
Where do the vectors live?
In a real Atlas deployment, running in Docker on the laptop, started from Python:
=
=
atlas-local-lib-py drives
the Atlas Local
container, which runs MongoDB and the search process side by side, so
$vectorSearch works against
mongodb://127.0.0.1:32768/?directConnection=true exactly as it does in the
cloud. get_or_create reuses a deployment with matching options or creates
one, so the cell can be re-run without thinking about it. (No Docker handy? A
free Atlas cluster does the
same job; it allows three indexes, search or vector, and this post needs one.)
Then the database, and the two indexes that make it an agency:
=
# 1. the collection has to exist before a search index can attach to it
pass
=
# 2. one document per person
# 3. the vector index
# 4. wait until it can be queried
=
break
.vector index ready
(One dot: on an empty collection the index went from PENDING to READY
inside the first three-second sleep.)
TIP: MongoDB creates databases and collections on first write, so most code never calls
create_collection. A search index is different: it attaches to a collection that exists. Skip step 1 on a fresh database and step 3 raisesOperationFailure:Error retrieving collection UUID and view info :: caused by :: Collection 'face_recognition.people' does not exist.So create the collection, then the index.
CollectionInvalidis what a second run gets, and it is fine.
Step 2 is a plain unique index on the name pair. It is what makes enrolment idempotent later, and it is the only thing stopping my agency from filing the same person twice.
Step 3 is the index this post is about. numDimensions has to match the model
(512 here; the limit is 8192). similarity is a choice, and it deserves its own
section.
Step 4 polls list_search_indexes until queryable is true. A search index is
built by the search process, not inline with the command, so the command
returns before the index can answer.
Why dotProduct and not cosine?
MongoDB offers three similarity functions for a vector index:
euclidean: straight-line distance between the vector ends.cosine: the angle between the vectors, magnitude ignored.dotProduct: like cosine, but magnitude counts.
Face embeddings are compared by angle, so option 1 is out. Between 2 and 3,
the docs
are direct: "To measure cosine similarity, we recommend that you normalize your
vectors and use dotProduct instead", with the condition that "you must
normalize the vector to unit length at index-time and query-time". We already
have unit-length vectors (that is what normed_embedding is), so dotProduct
gives the cosine and, in the docs' words, "consumes less computational
resources than cosine".
The score that comes back is not the cosine. For cosine, and so for
dotProduct on unit-length vectors, it is
score = (1 + cosine(v1, v2)) / 2
so that it lands in 0..1:
| cosine | score |
|---|---|
| -1 (opposite) | 0 |
| 0 (perpendicular) | 0.5 |
| 1 (same direction) | 1 |
Face recognition thresholds are published as cosines, so the lookup below converts in both directions: threshold to score before the query, score to cosine after it.
Enrolling 100 people
The dataset is 100 people who do not exist. I generated the faces with Higgsfield, one portrait per person, each with a JSON file for the name:
_dataset/img001.jpg
_dataset/img001.json   {"first_name": "Dalia", "last_name": "Novak", ...}
_dataset/img002.jpg
_dataset/img002.json
...
Enrolment is a loop over the JSON files:
=
, = ,
=
= # one face per portrait, in this dataset
preparing Dalia Novak embeddings
inserted Dalia Novak embeddings in db
preparing Hiroshi Sharma embeddings
inserted Hiroshi Sharma embeddings in db
...
preparing Mateo Haddad embeddings
inserted Mateo Haddad embeddings in db
100 people in 164 seconds on my CPU, almost all of it in app.get. Run the
cell again and it prints skipping 100 times in a tenth of a second: the
find_one on the name pair skips everyone already filed, with the unique index
from step 2 underneath in case two files share a name. One portrait per person
is what this dataset has; an agency with several photos of the same person
would store several documents and let the name index go.
The stored document is a name and the 512 numbers. Printing the first one, with the embedding cut to three numbers so it fits on a line:
{'first_name': 'Dalia', 'last_name': 'Novak', 'face_embedding': [-0.013844465836882591, -0.010554011911153793, 0.016035884618759155]}
Who is this?
Now the group picture, also generated. Six people, all of them in the files. Detect the faces, then ask the database about each one:
=
=
= 0.30
= / 2 # 0.65
=
=
return None
return f
$vectorSearch has to be the first stage. It takes the query vector, the index
name, how many neighbours to return, and one decision: how to search.
- Approximate nearest neighbours, the default. The index is an HNSW graph, and
numCandidatessays how far to walk it (the docs suggest at least 20 timeslimit). This is the setting for a collection you cannot afford to scan. - Exact nearest neighbours,
exact: True. Every vector in the index is compared to the query. The docs call it "computationally intensive", which at 100 documents is a rounding error: each lookup below took under 15 ms. - A
flatindex instead of HNSW: a non-graph index that does not approximate.
I picked 2. It is the same index and one flag, so when the agency grows past
what a scan can handle, the flag comes off and numCandidates goes on, and
nothing else changes. (I checked: ANN with numCandidates: 20 returned the
same person with the same score.)
The rest of the pipeline is bookkeeping. $meta: "vectorSearchScore" exposes
the score, $match drops anything below the threshold, and $project turns
the score back into a cosine so the number I print is the number the
literature uses. With limit: 1 the result is either the nearest person or
nothing.
To see how sure the database is, I asked it for the two nearest people per face instead of one, without the threshold, and printed the cosine of both:
, =
= f
= f
face 0: Ethan Aziz       cos=0.485   next: Rosa Nakagawa   0.212
face 1: Jamal Toure      cos=0.592   next: Daniel Ocampo   0.180
face 2: Freya Holm       cos=0.370   next: Layla Holm      0.147
face 3: Valentina Ricci  cos=0.494   next: Finn Ocampo     0.143
face 4: Mateo Haddad     cos=0.525   next: Kiara Iqbal     0.173
face 5: Yara O'Brien     cos=0.602   next: Petra Ferreira  0.198
Six for six, and the right answer is never close to the wrong one. Across the whole set, the nearest two different people are Beatriz Diallo and Sienna Okafor at cosine 0.264, so anything between 0.27 and 0.36 separates everyone in my files. The threshold is what turns "nearest" into "known", and I owe you the story of mine.
The first version of this notebook used real photos and a threshold of 0.38. Where did 0.38 come from? InsightFace's guide puts typical thresholds for its models between 0.30 and 0.45 and says to recompute for your own population. 0.38 is the middle of that range. I tried it, it worked, and I gave it no further thought.
Then I swapped the real photos for generated ones and Freya Holm disappeared. Look at face 2: cosine 0.370. Same woman, same generator, different photo, and the model is less sure about her than it had been about the real photos. Generated faces are a population of their own, and the guide had already told me to recompute. So: 0.30 for this dataset, and a red box instead of a name for anyone under it.
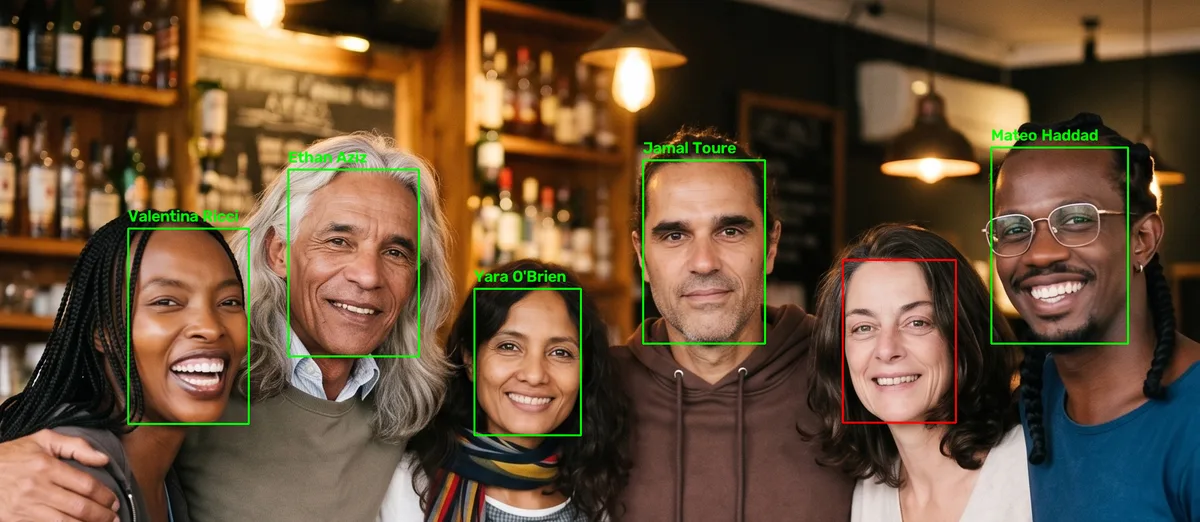
Drawing the answer
=
=
= is not None
=
, , , =
# keep the label on screen if the box is near the top edge
= - 10
Every detected face gets a box; only the ones the database vouches for get a
name. The colours look backwards because OpenCV orders channels as BGR, so
(0, 0, 255) is red. (In the notebook the picture comes from a
mo.ui.file upload widget rather than a path, and cv2.imdecode turns the
uploaded bytes into the same array cv2.imread would have given.)
That is the whole agency
One Docker container, one collection, two indexes, and one aggregation pipeline.
I started this to learn something about vector search, and the honest report
is that the search was the easy part. InsightFace does the seeing, MongoDB does
the remembering, and the query that finds a face is the same $vectorSearch
that finds a paragraph. The notebook is at
github.com/jeroenvervaeke/atlas-local-face-recognition;
uv run marimo edit face-recognition.py opens it, and the first cell after the
imports starts the database.
Now I want to know what else has a nearest neighbour. Songs? Handwriting? The bugs in my issue tracker? If you have embedded something that is not text, tell me about it on LinkedIn.